Setting up your Wi-Fi Connected Robot with the iRobot HOME App
How to setup my robot in the App
Download the iRobot® HOME App onto your mobile device. If you already have the iRobot® HOME App, we encourage you to visit the store to ensure you are running the latest version of the app. These operating systems are the minimum requirements.
Roomba is designed to operate on home Wi-Fi networks that support device discovery.
 iOS: Compatible with operating systems 15 and higher
 Android: Compatible with operating systems 9.0 and higher (app 7.2 is still available for Android 7 & 8 users)
Note: We no longer support iPad devices during setup. You may not be able to set up your robot on an iPad.
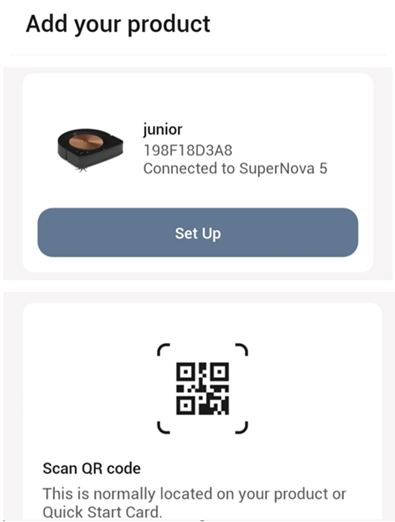
You can setup your robot using the QR Code on the box or the one in the Quick Start Cards.
- The iRobot HOME App will display the names of the Wi-Fi networks the robot can detect and is compatible with. Confirm this is the network you would like to use.

- Follow the instructions on the screen, then press on “My robot is ready”.

- Follow the charging station setup instructions. Press on “Continue”.

- Once you are ready press on “Get started”

Connecting Roomba® to the iRobot® HOME App
- Step 1: Setup your robot on the dock with the dock plugged in
- Note:
- For all robots – Tape and packaging materials should be removed from the robot and dock before starting
- For the AutoWash™ Dock – Pad wash roller and ramp need to be installed before starting
- For Roomba® Essentials – Please make sure you have removed the bumper guards and film from the dock
- Place the dock on a level surface that is free of obstacles. Place the dock as close to the router as possible to ensure good Wi-Fi coverage. Then connect it to power. There should be a small light from the dock. Make sure the dock is in a good location, and you are on the correct network frequency.
- Note: Roomba Essentials doesn’t have a light on the dock. Please still check that the cord is fully inserted on both sides.
- Note:
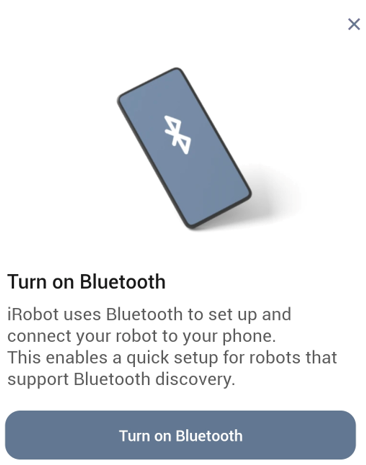
- Step 2: Verify Bluetooth is turned ON and you are on the Correct Network
- If you haven’t turned the Bluetooth on, the App will prompt you to
- Put your device on the network you wish to operate the robot with
- NOTE: Some robot models do not support 5GHz connectivity, and you may need to connect to your 2.4GHz network instead. Some robot models cannot connect to Wi-Fi at all. See below for a guide:
Robot 2.4 GHz 5 GHz Roomba Combo 10 Max ✓ ✓ Roomba Essentials ✓ – Roomba® Combo j7+/j9+ ✓ ✓ Roomba® Combo j5 ✓ ✓ Roomba® j7/j9 ✓ ✓ Roomba® i1-i5/Roomba® Combo i5 ✓ – Roomba Combo i8 ✓ – Roomba® s9 ✓ ✓ Roomba® i6, i7, i8 ✓ ✓ Roomba Combo ✓ – Roomba® 900 ✓ – Wi-Fi Connected Roomba® 800 ✓ – Roomba® 670, 690 ✓ – Models below Roomba® 670 – – - If the robot does not support 5GHz, ensure mobile device is on 2.4Ghz Wi-Fi (Not needed if the robot supports 5GHz)
- If you haven’t turned the Bluetooth on, the App will prompt you to
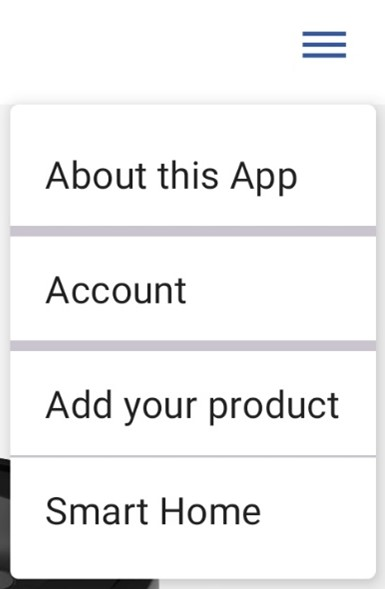
- Step 3: Select “Add Robot” in the App
- The app is intended to support multiple iRobot® products.
- Tap the 3 lines in the upper right corner of the screen to reveal the main menu, then tap on “Add your product”.
- A nearby product has been found, press “Set Up” to continue connecting your robot.
- Step 4: Follow the app instructions to connect Roomba® to your Wi-Fi
- Follow along in the app to choose the Wi-Fi you want to use. Enter the Wi-Fi password and activate your robot.
- Name Your Robot
- The name “Roomba” is preloaded, but you can give your Roomba® a personal name. Name it whatever you want! Press “Continue”.
- Note: Your robot will now be associated with your account. It may take a few minutes for our system to set up your robot appropriately. If in a few minutes there is still no connection, please close and reopen the app.
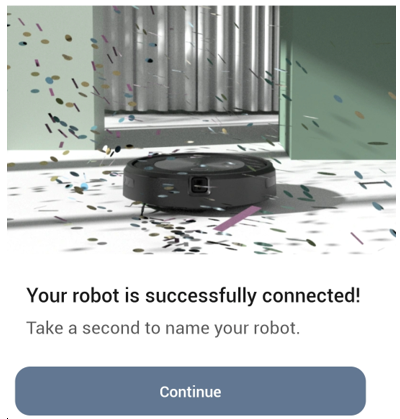
- Step 5: Setup complete
- Congratulations. Your robot is now set up and ready to go. Welcome to the iRobot family!
- Congratulations. Your robot is now set up and ready to go. Welcome to the iRobot family!